기술 스택: React.js
배포 링크: https://kosy0907.github.io/EV-map/
소스코드 링크: https://github.com/kosy0907/EV-map (Private)
소개
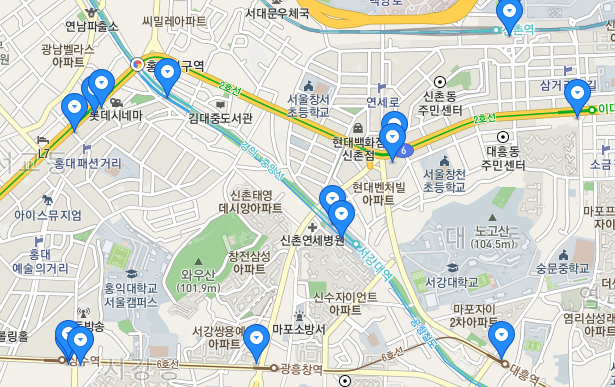
서울시 내 지하철역 근처의 교통약자용 엘리베이터 위치를 지도에 표시해주는 웹 사이트이다.
이 프로젝트는 2021년, 내가 다리를 다쳤을 때 지하철 이용에 불편을 느낀 경험을 살려 진행했다.
기능
- 지하철역 근처의 교통약자용 엘리베이터 위치 표시
- 역 이름 검색
개발기간
2022.01.21 ~ 2022.01.30
사용 API
Geolocation API
디자인 -> 구현 순서로 진행

지도로 화면을 채우고 search form을 넣으면 디자인은 끝이다.
- Map Component
- Search Component: 검색창
- KaKaoMapScript Component: API와 지도
1. 데이터 가져오기
공공데이터포털의 서울특별시 지하철역 엘리베이터 위치정보 파일을 사용했다.
해당 데이터는 서울시 내 지하철역 주변의 교통약자용 엘리베이터 정보를 제공한다.
https://www.data.go.kr/tcs/dss/selectFileDataDetailView.do?publicDataPk=15098148
서울특별시_지하철역 엘리베이터 위치정보_20220111
서울시 내 지하철역 주변의 교통약자용 엘리베이터 위치를 제공합니다. 좌표계는 WGS84을 사용합니다.<br/>노드링크 유형, 노드 WKT, 노드 ID, 노드 유형 코드, 시군구코드, 시군구명, 읍면동코드, 읍
www.data.go.kr
가져온 데이터는 src/data/elevatorLocation.js에 JSON 객체 형태로 저장한다.
// elevatorLocation.js
export const elevatorLocation =
{
  "DESCRIPTION": { "NODE_WKT": "노드 WKT", "SW_NM": "지하철역명", "SW_CD": "지하철역코드", "SGG_NM": "시군구명", "SGG_CD": "시군구코드", "NODE_ID": "노드 ID", "NODE_CODE": "노드 유형 코드", "EMD_NM": "읍면동명", "TYPE": "노드링크 유형", "EMD_CD": "읍면동코드" },
  "DATA": [
          { "sgg_cd": "1111000000", "emd_nm": "종로2가", "node_code": "0", "emd_cd": "1111013800", "node_wkt": "POINT(126.98397877663305 37.57010684982412)", "sgg_nm": "종로구", "type": "NODE", "sw_nm": null, "sw_cd": null, "node_id": 86879 },
          { "sgg_cd": "1111000000", "emd_nm": "숭인동", "node_code": "0", "emd_cd": "1111017500", "node_wkt": "POINT(127.01744971746365 37.57329704981851)", "sgg_nm": "종로구", "type": "NODE", "sw_nm": "동묘앞", "sw_cd": "268", "node_id": 212659 }
}
2. 틀 제작
2-1. 프로젝트 생성
create react-app ev-map2-2. 지도를 표시할 Map Component 작성
// Map.js

import React from 'react';

const Map = () => {
    return (
        <div>
            <Search/> // 검색창
            <KakaoMapScript/> // api & 지도
        </div>
    );
};

export default Map;
3. api 가져오기
KaKao Map api를 이용할 것이므로 KaKao Developers에 로그인 후, 애플리케이션을 추가한다.
Kakao Developers
카카오 API를 활용하여 다양한 어플리케이션을 개발해보세요. 카카오 로그인, 메시지 보내기, 친구 API, 인공지능 API 등을 제공합니다.
developers.kakao.com
애플리케이션을 등록하면 api key를 발급받을 수 있다.
보안을 위해 .env 파일을 생성한 후, api key를 넣자.
// .env
REACT_APP_KAKAO_KEY = <api key>
index.html에 script 추가도 잊지 말자.
<!DOCTYPE html>
...
    <script type="text/javascript" src="//dapi.kakao.com/v2/maps/sdk.js?appkey=%REACT_APP_KAKAO_KEY%"></script>
...
</html>
kaKaoScript.js 파일을 생성하고 api를 가져온다.
// kaKaoScript.js
import react from "react";
import styled from "styled-components";
const { kakao } = window;

const MapDiv = styled.div`
    width: '100%',
    height: '100vh'
`

export default function KakaoMapScript({ searchText }) {

    useEffect(() => {
        // kakao map
        const container = document.getElementById('kakao-map');
        const options = {
            center: new kakao.maps.LatLng(37.566826, 126.9786567),
            level: 3
        };
        const map = new kakao.maps.Map(container, options);

    return (
        <MapDiv id="kakao-map" style={{ width: "100%", height: "100vh" }} />
    )
}
4. 지도에 marker 추가
4-1. 현재 내 위치 표시
geolocation api를 사용하여 현재 내 위치를 지도에 표시할 수 있다.
PC 환경에서는 내 위치를 제대로 잡지 못하지만, 모바일 환경에서는 정확하게 잡는 편이다.
// kakaoScript.js
	...
    	const getCurrentPos = () => {
            if (navigator.geolocation) {
                navigator.geolocation.getCurrentPosition(
                    function (position) {
                        var lat = position.coords.latitude;
                        var lon = position.coords.longitude;
                        // 내 현재 위치를 kakao map에 표시한다.
                        var currentPos = new kakao.maps.LatLng(lat, lon);
                        var marker = new kakao.maps.Marker({
                            map: map,
                            position: currentPos,
                            image: new kakao.maps.MarkerImage(
                                "https://t1.daumcdn.net/localimg/localimages/07/mapapidoc/markerStar.png",
                                new kakao.maps.Size(24, 35),
                                { offset: new kakao.maps.Point(13, 35) }
                            )
                        });
                        map.setCenter(currentPos);
                    },
                    // 위치를 가져올 수 없는 경우, 카카오 본사로 위치를 잡는다.
                    function (err) {
                        options.center = new kakao.maps.LatLng(37.566826, 126.9786567);
                        const map = new kakao.maps.Map(container, options);
                    })
            }
        }
        getCurrentPos();
        ...
4-2. 엘리베이터 위치 표시
markers 리스트를 생성하고 elevatorLocation.js의 데이터를 전처리해서 위도(lat), 경도(lng)를 뽑아내서 kaka.maps.Marker의 position에 넣는다.
useEffect(()=>{
...
       const markers = [];
        for (var i = 0; i < elevatorLocation.DATA.length; i++) {
            var point = elevatorLocation.DATA[i].node_wkt
                .split("(")[1]
                .split(")")[0]
                .split(" ");

            var latlng = new kakao.maps.LatLng(
                parseFloat(point[1]),
                parseFloat(point[0])
            );

            var marker = new kakao.maps.Marker({
                position: latlng,
                clickable: false,
            });
            markers.push(marker);
        }
        return markers;
    }, []);
...
})
5. 검색 기능 추가
5-1. Map.js 수정
Search.js에서 searchText state를 업데이트 할 수 있도록 setSearchText를 props로 전달한다.
KaKaoMapScript Componenent에는 searchText를 props로 전달한다.
// Map.js

import React, { useEffect, useState } from 'react';
import KakaoMapScript from './kakaoScript';
import Search from './Search';
const { kakao } = window;

const Map = () => {
    const [searchText, setSearchText] = useState('');

    return (
        <div>
            <Search setSearchText={setSearchText} searchText={searchText} />
            <KakaoMapScript searchText={searchText} />
        </div>
    );
};

export default Map;
5-2. Search Component 작성
import React, { useState } from 'react';
import styled from 'styled-components';
import { FontAwesomeIcon } from "@fortawesome/react-fontawesome";
import { faSearch } from '@fortawesome/free-solid-svg-icons';
const SearchContainer = styled.div`
...
`
const Form = styled.form`
...
`
const Input = styled.input`
...
`
const SearchBtn = styled.button`
...
`
const Search = (props) => {
const [inputText, setInputText] = useState('');
// InputText를 입력한 value로 설정
const handleInputChange = (e) => {
e.preventDefault();
setInputText(e.target.value);
}
// SearchText를 inputText로 설정
const handleSubmit = (e) => {
e.preventDefault();
props.setSearchText(inputText);
}
// input 창이 비어있는 경우
const textChecker = (e) => {
if (inputText === '') {
alert('검색어를 입력해주세요!');
}
}
return (
<SearchContainer>
<Form onSubmit={handleSubmit}>
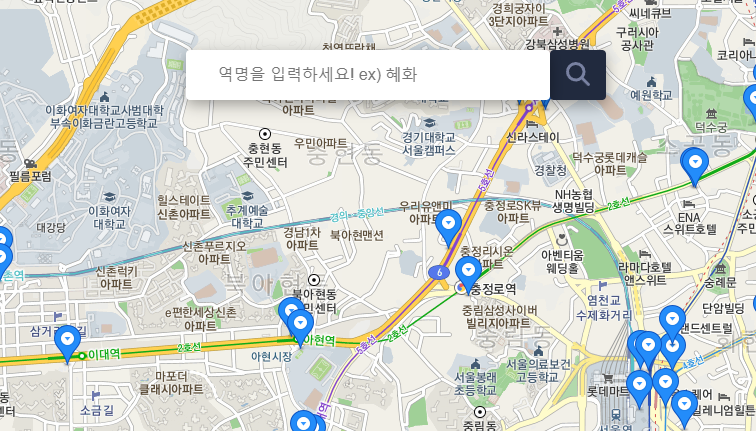
<Input type='text' value={inputText} onChange={handleInputChange} placeholder='역명을 입력하세요! ex) 혜화' />
<SearchBtn type='submit' onClick={textChecker}><FontAwesomeIcon icon={faSearch} /></SearchBtn>
</Form>
</SearchContainer>
);
}
export default Search;여기서 검색창에 텍스트를 입력할 때마다 속도가 느려지는 문제가 발생했다.
텍스트를 입력할 때마다 위치를 나타내는 marker가 제렌더링 되는 것이 원인이었다.
useEffect 안에 넣지 말고 useMemo를 사용하여 해결한다.
// kakaoScript.js
...
const markers = useMemo(() => {
        const markers = [];
        for (var i = 0; i < elevatorLocation.DATA.length; i++) {
            var point = elevatorLocation.DATA[i].node_wkt
                .split("(")[1]
                .split(")")[0]
                .split(" ");

            var latlng = new kakao.maps.LatLng(
                parseFloat(point[1]),
                parseFloat(point[0])
            );

            var marker = new kakao.maps.Marker({
                position: latlng,
                clickable: false,
            });
            markers.push(marker);
        }
        return markers;
    }, []);
...
useEffect(() => {
            // kakao map
            const container = document.getElementById('kakao-map');
            const options = {
                center: new kakao.maps.LatLng(37.566826, 126.9786567),
                level: 3
            };
            const newMap = new kakao.maps.Map(container, options);
            setMap(newMap);

            for (var j = 0; j < markers.length; j++) {
                markers[j].setMap(newMap);
            }
          )
...
여기서 문제가 하나 더 생긴다.
Cannot read property 'map' of undefinedmap이 완전히 로드되지 않은 상태일 때, 함수에서 map을 호출하기 때문에 발생하는 error이다.
마커를 설정하는 코드를 별도의 useMemo 후크로 이동하여 구성 요소를 마운트할 때 한 번만 호출하도록 수정한다.
또한, map이 로드되면 함수를 호출하도록 kakao.maps.load() 안에 api를 호출 함수를 넣는다.
    ...
    const markers = useMemo(() => {
        const markers = [];
        for (var i = 0; i < elevatorLocation.DATA.length; i++) {
            var point = elevatorLocation.DATA[i].node_wkt
                .split("(")[1]
                .split(")")[0]
                .split(" ");

            var latlng = new kakao.maps.LatLng(
                parseFloat(point[1]),
                parseFloat(point[0])
            );

            var marker = new kakao.maps.Marker({
                position: latlng,
                clickable: false,
            });
            markers.push(marker);
        }
        return markers;
    }, []);
    ...
useEffect(() => {
kakao.maps.load(() => {
...
// searchText가 있을 때, elevatorLocation DATA의 sw_nm과 searchText가 같으면 해당하는 위도, 경도를 찾아 지도 이동
if (searchText) {
const filteredLocations = elevatorLocation.DATA.filter(location => {
const regex = new RegExp(searchText.replace('역', '') + '역?');
if (location.sw_nm === null) {
return regex.test(location.emd_nm);
} else {
return regex.test(location.sw_nm);
}
});
if (filteredLocations.length > 0) {
const regex = /\d+\.\d+/g;
const filteredPoint = filteredLocations[0].node_wkt.match(regex);
console.log(filteredPoint);
const moveLotation = new kakao.maps.LatLng(parseFloat(filteredPoint[1]), parseFloat(filteredPoint[0]));
console.log(moveLotation);
kakao.maps.event.addListener(newMap, 'tilesloaded', function () {
newMap.panTo(moveLotation);
}
)
} else {
alert('결과를 찾을 수 없습니다!')
}
})
}, [searchText, markers]);
6. 배포
배포는 GitHub Pages를 이용했다.
GitHub Pages - GitHub Repository의 프로젝트를 호스팅해주는 기능
배포 방법은 다음과 같다.
1. 레포지토리(public)를 생성하고 프로젝트를 commit, push
2. 배포하고 싶은 프로젝트에 gh-pages를 설치한다.
npm install gh-pages --save-dev
or
yarn add gh-pages --save-dev
3. package.json 수정
- "homepage": "https://<git ID>.github.io/<project name>"
- "predeploy": "npm run build"m
- "deploy": "gh-pages -d build"
{
  "homepage": "https://kosy0907.github.io/EV-map",
  "name": "ev-map",
  "version": "0.1.0",
  "private": true,
  "dependencies": {
    ...
  },
  "scripts": {
    "start": "react-scripts start",
    "build": "react-scripts build",
    "test": "react-scripts test",
    "eject": "react-scripts eject",
    "predeploy": "npm run build",
    "deploy": "gh-pages -d build"
  },
  ...
npm run deploy
배포가 완료되면, Environment가 active 상태로 설정된다.
Environments를 클릭하면 배포 히스토리를 확인할 수 있다.

View deployment를 클릭해보자.
'React.js > Project' 카테고리의 다른 글
| 포트폴리오 웹사이트 제작기 (0) | 2023.04.08 |
|---|