기술 스택: React.js
배포 링크: https://kosy0907.github.io/EV-map/
소스코드 링크: https://github.com/kosy0907/EV-map (Private)
소개
서울시 내 지하철역 근처의 교통약자용 엘리베이터 위치를 지도에 표시해주는 웹 사이트이다.
이 프로젝트는 2021년, 내가 다리를 다쳤을 때 지하철 이용에 불편을 느낀 경험을 살려 진행했다.
기능
- 지하철역 근처의 교통약자용 엘리베이터 위치 표시
- 역 이름 검색
개발기간
2022.01.21 ~ 2022.01.30
사용 API
Geolocation API
디자인 -> 구현 순서로 진행
figma
Map Component
Search Component: 검색창
KaKaoMapScript Component: API와 지도
1. 데이터 가져오기
공공데이터포털의 서울특별시 지하철역 엘리베이터 위치정보 파일을 사용했다.
해당 데이터는 서울시 내 지하철역 주변의 교통약자용 엘리베이터 정보를 제공한다.
https://www.data.go.kr/tcs/dss/selectFileDataDetailView.do?publicDataPk=15098148
서울특별시_지하철역 엘리베이터 위치정보_20220111
서울시 내 지하철역 주변의 교통약자용 엘리베이터 위치를 제공합니다. 좌표계는 WGS84을 사용합니다.<br/>노드링크 유형, 노드 WKT, 노드 ID, 노드 유형 코드, 시군구코드, 시군구명, 읍면동코드, 읍
www.data.go.kr
가져온 데이터는 src/data/elevatorLocation.js에 JSON 객체 형태로 저장한다.
// elevatorLocation.js
export const elevatorLocation =
{
  "DESCRIPTION": { "NODE_WKT": "노드 WKT", "SW_NM": "지하철역명", "SW_CD": "지하철역코드", "SGG_NM": "시군구명", "SGG_CD": "시군구코드", "NODE_ID": "노드 ID", "NODE_CODE": "노드 유형 코드", "EMD_NM": "읍면동명", "TYPE": "노드링크 유형", "EMD_CD": "읍면동코드" },
  "DATA": [
          { "sgg_cd": "1111000000", "emd_nm": "종로2가", "node_code": "0", "emd_cd": "1111013800", "node_wkt": "POINT(126.98397877663305 37.57010684982412)", "sgg_nm": "종로구", "type": "NODE", "sw_nm": null, "sw_cd": null, "node_id": 86879 },
          { "sgg_cd": "1111000000", "emd_nm": "숭인동", "node_code": "0", "emd_cd": "1111017500", "node_wkt": "POINT(127.01744971746365 37.57329704981851)", "sgg_nm": "종로구", "type": "NODE", "sw_nm": "동묘앞", "sw_cd": "268", "node_id": 212659 }
}
2. 틀 제작
2-1. 프로젝트 생성
create react-app ev-map2-2. 지도를 표시할 Map Component 작성
// Map.js

import React from 'react';

const Map = () => {
    return (
        <div>
            <Search/> // 검색창
            <KakaoMapScript/> // api & 지도
        </div>
    );
};

export default Map;
3. api 가져오기
KaKao Map api를 이용할 것이므로 KaKao Developers에 로그인 후, 애플리케이션을 추가한다.
https://developers.kakao.com/
Kakao Developers
카카오 API를 활용하여 다양한 어플리케이션을 개발해보세요. 카카오 로그인, 메시지 보내기, 친구 API, 인공지능 API 등을 제공합니다.
developers.kakao.com
애플리케이션을 등록하면 api key를 발급받을 수 있다.
보안을 위해 .env 파일을 생성한 후, api key를 넣자.
// .env
REACT_APP_KAKAO_KEY = <api key>
index.html에 script 추가도 잊지 말자.
<!DOCTYPE html>
...
    <script type="text/javascript" src="//dapi.kakao.com/v2/maps/sdk.js?appkey=%REACT_APP_KAKAO_KEY%"></script>
...
</html>
kaKaoScript.js 파일을 생성하고 api를 가져온다.
// kaKaoScript.js
import react from "react";
import styled from "styled-components";
const { kakao } = window;

const MapDiv = styled.div`
    width: '100%',
    height: '100vh'
`

export default function KakaoMapScript({ searchText }) {

    useEffect(() => {
        // kakao map
        const container = document.getElementById('kakao-map');
        const options = {
            center: new kakao.maps.LatLng(37.566826, 126.9786567),
            level: 3
        };
        const map = new kakao.maps.Map(container, options);

    return (
        <MapDiv id="kakao-map" style={{ width: "100%", height: "100vh" }} />
    )
}
4. 지도에 marker 추가
4-1. 현재 내 위치 표시
geolocation api를 사용하여 현재 내 위치를 지도에 표시할 수 있다.
PC 환경에서는 내 위치를 제대로 잡지 못하지만, 모바일 환경에서는 정확하게 잡는 편이다.
// kakaoScript.js
	...
    	const getCurrentPos = () => {
            if (navigator.geolocation) {
                navigator.geolocation.getCurrentPosition(
                    function (position) {
                        var lat = position.coords.latitude;
                        var lon = position.coords.longitude;
                        // 내 현재 위치를 kakao map에 표시한다.
                        var currentPos = new kakao.maps.LatLng(lat, lon);
                        var marker = new kakao.maps.Marker({
                            map: map,
                            position: currentPos,
                            image: new kakao.maps.MarkerImage(
                                "https://t1.daumcdn.net/localimg/localimages/07/mapapidoc/markerStar.png",
                                new kakao.maps.Size(24, 35),
                                { offset: new kakao.maps.Point(13, 35) }
                            )
                        });
                        map.setCenter(currentPos);
                    },
                    // 위치를 가져올 수 없는 경우, 카카오 본사로 위치를 잡는다.
                    function (err) {
                        options.center = new kakao.maps.LatLng(37.566826, 126.9786567);
                        const map = new kakao.maps.Map(container, options);
                    })
            }
        }
        getCurrentPos();
        ...
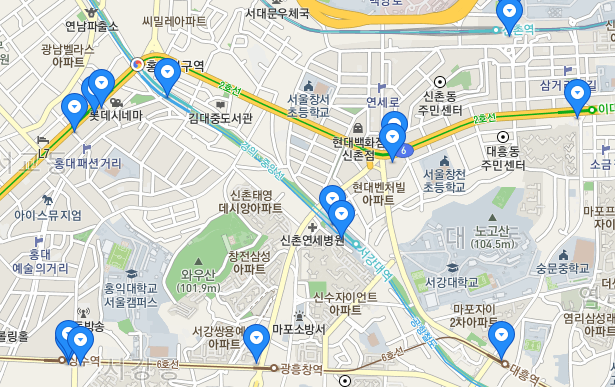
4-2. 엘리베이터 위치 표시
markers 리스트를 생성하고 elevatorLocation.js의 데이터를 전처리해서 위도(lat), 경도(lng)를 뽑아내서 kaka.maps.Marker의 position에 넣는다.
useEffect(()=>{
...
       const markers = [];
        for (var i = 0; i < elevatorLocation.DATA.length; i++) {
            var point = elevatorLocation.DATA[i].node_wkt
                .split("(")[1]
                .split(")")[0]
                .split(" ");

            var latlng = new kakao.maps.LatLng(
                parseFloat(point[1]),
                parseFloat(point[0])
            );

            var marker = new kakao.maps.Marker({
                position: latlng,
                clickable: false,
            });
            markers.push(marker);
        }
        return markers;
    }, []);
...
})
5. 검색 기능 추가
5-1. Map.js 수정
Search.js에서 searchText state를 업데이트 할 수 있도록 setSearchText를 props로 전달한다.
KaKaoMapScript Componenent에는 searchText를 props로 전달한다.
// Map.js

import React, { useEffect, useState } from 'react';
import KakaoMapScript from './kakaoScript';
import Search from './Search';
const { kakao } = window;

const Map = () => {
    const [searchText, setSearchText] = useState('');

    return (
        <div>
            <Search setSearchText={setSearchText} searchText={searchText} />
            <KakaoMapScript searchText={searchText} />
        </div>
    );
};

export default Map;
5-2. Search Component 작성
import React, { useState } from 'react';
import styled from 'styled-components';
import { FontAwesomeIcon } from "@fortawesome/react-fontawesome";
import { faSearch } from '@fortawesome/free-solid-svg-icons';
const SearchContainer = styled.div`
...
`
const Form = styled.form`
...
`
const Input = styled.input`
...
`
const SearchBtn = styled.button`
...
`
const Search = (props) => {
const [inputText, setInputText] = useState('');
// InputText를 입력한 value로 설정
const handleInputChange = (e) => {
e.preventDefault();
setInputText(e.target.value);
}
// SearchText를 inputText로 설정
const handleSubmit = (e) => {
e.preventDefault();
props.setSearchText(inputText);
}
// input 창이 비어있는 경우
const textChecker = (e) => {
if (inputText === '') {
alert('검색어를 입력해주세요!');
}
}
return (
<SearchContainer>
<Form onSubmit={handleSubmit}>
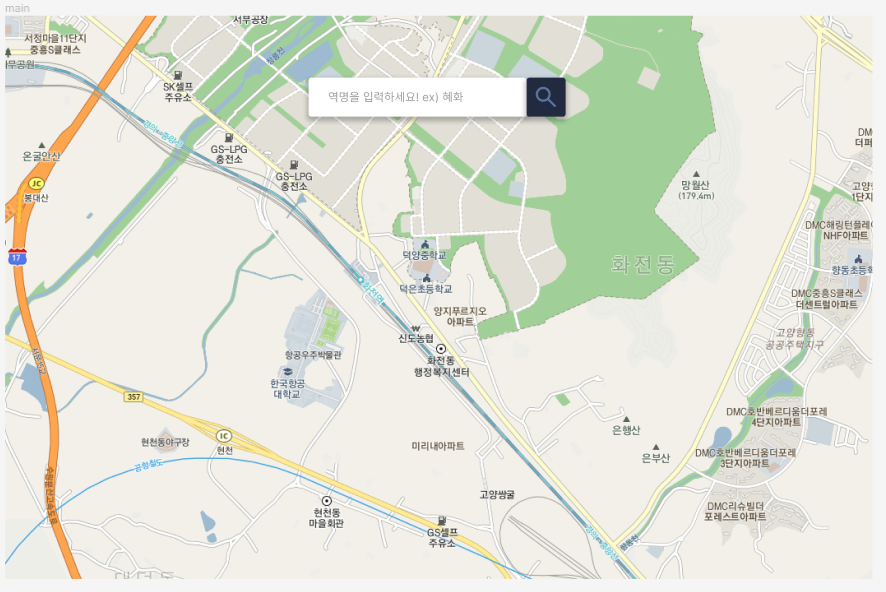
<Input type='text' value={inputText} onChange={handleInputChange} placeholder='역명을 입력하세요! ex) 혜화' />
<SearchBtn type='submit' onClick={textChecker}><FontAwesomeIcon icon={faSearch} /></SearchBtn>
</Form>
</SearchContainer>
);
}
export default Search;여기서 검색창에 텍스트를 입력할 때마다 속도가 느려지는 문제가 발생했다.
텍스트를 입력할 때마다 위치를 나타내는 marker가 제렌더링 되는 것이 원인 이었다.
useEffect 안에 넣지 말고 useMemo를 사용하여 해결한다.
// kakaoScript.js
...
const markers = useMemo(() => {
        const markers = [];
        for (var i = 0; i < elevatorLocation.DATA.length; i++) {
            var point = elevatorLocation.DATA[i].node_wkt
                .split("(")[1]
                .split(")")[0]
                .split(" ");

            var latlng = new kakao.maps.LatLng(
                parseFloat(point[1]),
                parseFloat(point[0])
            );

            var marker = new kakao.maps.Marker({
                position: latlng,
                clickable: false,
            });
            markers.push(marker);
        }
        return markers;
    }, []);
...
useEffect(() => {
            // kakao map
            const container = document.getElementById('kakao-map');
            const options = {
                center: new kakao.maps.LatLng(37.566826, 126.9786567),
                level: 3
            };
            const newMap = new kakao.maps.Map(container, options);
            setMap(newMap);

            for (var j = 0; j < markers.length; j++) {
                markers[j].setMap(newMap);
            }
          )
...
여기서 문제가 하나 더 생긴다.
Cannot read property 'map' of undefinedmap이 완전히 로드되지 않은 상태일 때, 함수에서 map을 호출하기 때문에 발생하는 error이다.
마커를 설정하는 코드를 별도의 useMemo 후크로 이동하여 구성 요소를 마운트할 때 한 번만 호출하도록 수정한다.
또한, map이 로드되면 함수를 호출하도록 kakao.maps.load() 안에 api를 호출 함수를 넣는다.
    ...
    const markers = useMemo(() => {
        const markers = [];
        for (var i = 0; i < elevatorLocation.DATA.length; i++) {
            var point = elevatorLocation.DATA[i].node_wkt
                .split("(")[1]
                .split(")")[0]
                .split(" ");

            var latlng = new kakao.maps.LatLng(
                parseFloat(point[1]),
                parseFloat(point[0])
            );

            var marker = new kakao.maps.Marker({
                position: latlng,
                clickable: false,
            });
            markers.push(marker);
        }
        return markers;
    }, []);
    ...
useEffect(() => {
kakao.maps.load(() => {
...
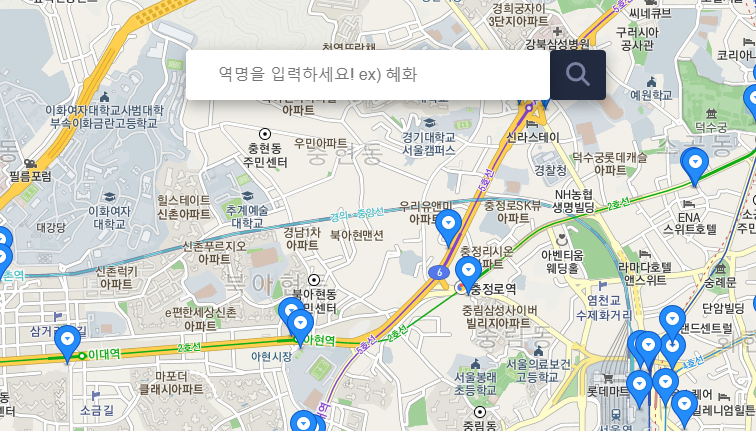
// searchText가 있을 때, elevatorLocation DATA의 sw_nm과 searchText가 같으면 해당하는 위도, 경도를 찾아 지도 이동
if (searchText) {
const filteredLocations = elevatorLocation.DATA.filter(location => {
const regex = new RegExp(searchText.replace('역', '') + '역?');
if (location.sw_nm === null) {
return regex.test(location.emd_nm);
} else {
return regex.test(location.sw_nm);
}
});
if (filteredLocations.length > 0) {
const regex = /\d+\.\d+/g;
const filteredPoint = filteredLocations[0].node_wkt.match(regex);
console.log(filteredPoint);
const moveLotation = new kakao.maps.LatLng(parseFloat(filteredPoint[1]), parseFloat(filteredPoint[0]));
console.log(moveLotation);
kakao.maps.event.addListener(newMap, 'tilesloaded', function () {
newMap.panTo(moveLotation);
}
)
} else {
alert('결과를 찾을 수 없습니다!')
}
})
}, [searchText, markers]);
6. 배포
배포는 GitHub Pages를 이용했다.
GitHub Pages - GitHub Repository의 프로젝트를 호스팅해주는 기능
배포 방법은 다음과 같다.
1. 레포지토리(public)를 생성하고 프로젝트를 commit, push
2. 배포하고 싶은 프로젝트에 gh-pages
npm install gh-pages --save-dev
or
yarn add gh-pages --save-dev
3. package.json 수정
"homepage": "https://<git ID>.github.io/<project name>"
"predeploy": "npm run build"m
"deploy": "gh-pages -d build"
{
  "homepage": "https://kosy0907.github.io/EV-map",
  "name": "ev-map",
  "version": "0.1.0",
  "private": true,
  "dependencies": {
    ...
  },
  "scripts": {
    "start": "react-scripts start",
    "build": "react-scripts build",
    "test": "react-scripts test",
    "eject": "react-scripts eject",
    "predeploy": "npm run build",
    "deploy": "gh-pages -d build"
  },
  ...
npm run deploy
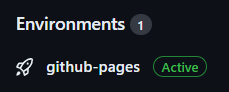
배포가 완료되면, Environment가 active 상태로 설정된다.
Environments를 클릭하면 배포 히스토리를 확인할 수 있다.
View deployment를 클릭해보자.